


Archiving is a problem for every editor on the planet! Many have suitable backup solutions in place, however, archiving is different. Do you have a strategy to preserve your work, or more importantly, your clients work, for the long-term. In 5 years time if your drives fail to spin up does the content exist somewhere else. In the days of tape you could always return to the original tape masters, in the days of film you could return to the film negative, in the days of digital, today, where content is mostly shot to some form of media card, which is then erased once the content has been transferred to hard drive – we live in a very different place.
Almost nobody keeps their masters anymore. The camera original masters are transferred to hard drive and the media used in camera is then wiped and reused.
Most editors will then back-up the media to a second hard drive, and if they are smart, will regularly back up the entire project. Once the project is complete, all files are stored on 2 or more drives, so if a master drive fails, you can go to the second hard drive. For most that is where the process begins and ends.
The problem is that drives do fail. The nature of moving parts with bearing, lubricants, platters, power supplies, means the lifetime may be 5 or 10 or 15 years, however, the risk of hard drive death increases with each passing moment.
It is my belief that we, as video producers, editors, content producers and providers, need both a backup solution and an archive solution.
For those working throughout the production process, from shooting to post production, we need 3 areas of protection:
(i) Immediate backup – this is your most precious content, the jobs which are earning you money right now. For these projects, at minimum, you store all data and project information on 2 separate drives. 3 separate drives is not unheard of. The idea is if one drive fails, you can immediately go to the backup, retrieve the data and continue working.
(ii) Medium term backup – anywhere from 3 months to 5 years. Entire projects with all media are stored on hard drive. 2 or 3 separate copies may be kept, however, many editors leave it simply on one drive risking everything if the drive crashes or goes missing.
(iii) Archive – for this were talking anywhere from 5 years to 30 or 50 years. The archive is made once a job is signed off and approved, done and dusted, you’ve been paid and you want to put the project to bed. The archive is your fail-safe; if a hard drive stops working or goes missing, the archive is there to save you. Many editors, producers and production facilities have no archive system in place. Many don’t have a backup system in place either.
The problem in the modern world of post production is we need terabytes of space to store our content! And with the tidal wave of 4K production already raining down upon us, the situation is getting worse.
For immediate backup and medium term backup I’ve relied on 2 and 4TB hard drives to store content. Beyond this, for long-term archive I have had no solution in place, mainly because there hasn’t been a suitable solution, or those which have existed have been wildly out of my price range.
There are a few proprietary system out there designed for archive, however, I shy away from any system built only by one manufacturer. Simply because you have to wonder in 15 or 30 years if you’ll be able to find a device to read the data. Too often technology quietly dies and you end up searching on eBay for any units that may be out there for sale.
LTO6 Tape
LTO is a cartridge-based tape system and industry standard for data information backup. This means it has been adopted by several manufacturers, there is a roadmap for the future, and the longevity of LTO is ensured by a consortium of manufacturers who have committed to the on-going development of the format. LTO for data archive is used widely in banks, government departments, insurance, wherever large amounts of information needs to be recorded and reliably archived.
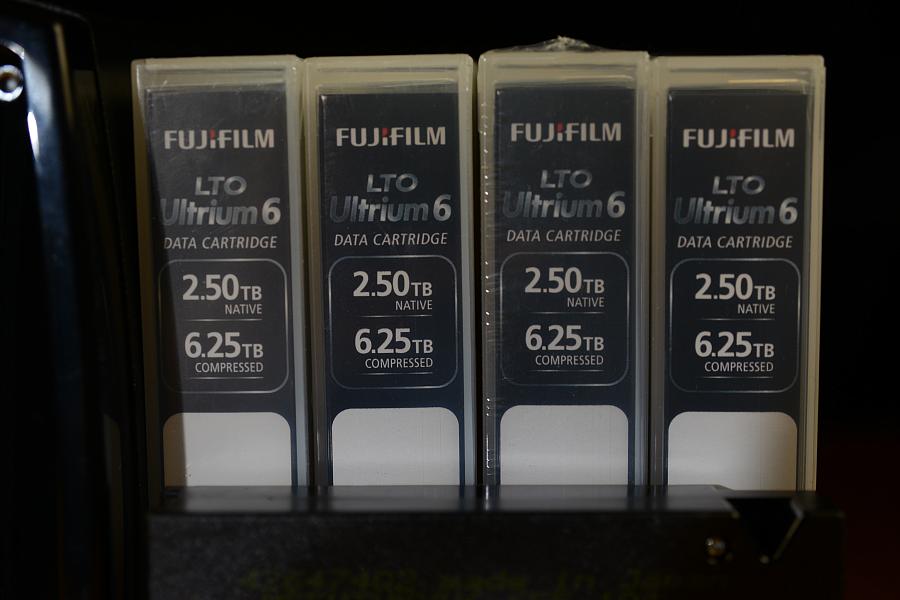
The current and latest offering is LTO6. This provides 2.5 terabytes of storage, and is now available as a Thunderbolt solution, which is fully Mac compatible and operates in an easy drag and drop way (similar to copying files to hard drive.)
Tapes used by LTO6 are regarded as having a life expectancy of 30 years or beyond – FujiFilm, who make the LTO Ultrium 6 cartridges, state on their website:
Long Archival Life Barium Ferrite is chemically stable (already oxidized) and does not easily get demagnetized by outside energy. Therefore magnetic tape using Barium Ferrite is said to have a longer archival life of more than 30 years based on Fujifilm’s acceleration tests.
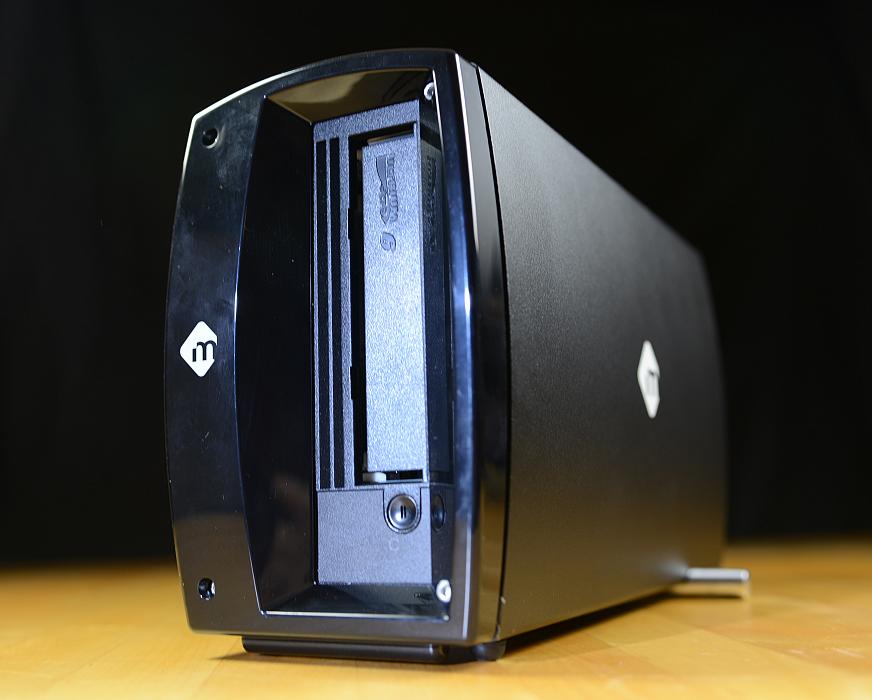
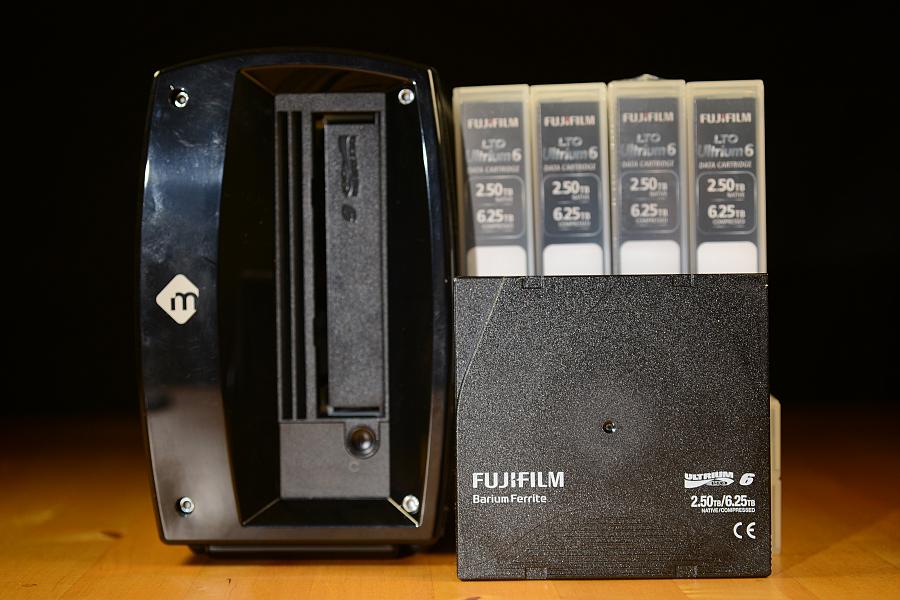
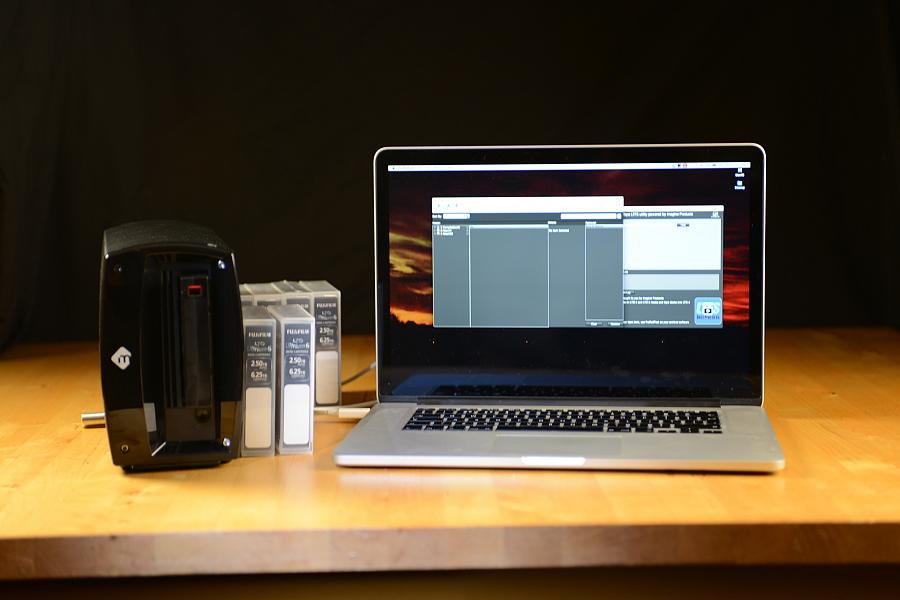
The LTO6 solution I have been working with is mTape by mLogic.
LTO is a cartridge-based tape system and industry standard for data information backup. This means it has been adopted by several manufacturers, there is a roadmap for the future, and the longevity of LTO is ensured by a consortium of manufacturers who have committed to the on-going development of the format. LTO for data archive is used widely in banks, government departments, insurance, wherever large amounts of information needs to be recorded and reliably archived.
The current and latest offering is LTO6. This provides 2.5 terabytes of storage, and is now available as a Thunderbolt solution, which is fully Mac compatible and operates in an easy drag and drop way (similar to copying files to hard drive.)
Tapes used by LTO6 are regarded as having a life expectancy of 30 years or beyond – FujiFilm, who make the LTO Ultrium 6 cartridges, state on their website:
Long Archival Life Barium Ferrite is chemically stable (already oxidized) and does not easily get demagnetized by outside energy. Therefore magnetic tape using Barium Ferrite is said to have a longer archival life of more than 30 years based on Fujifilm’s acceleration tests.
The LTO6 solution I have been working with is mTape by mLogic.
mTape by mLogic
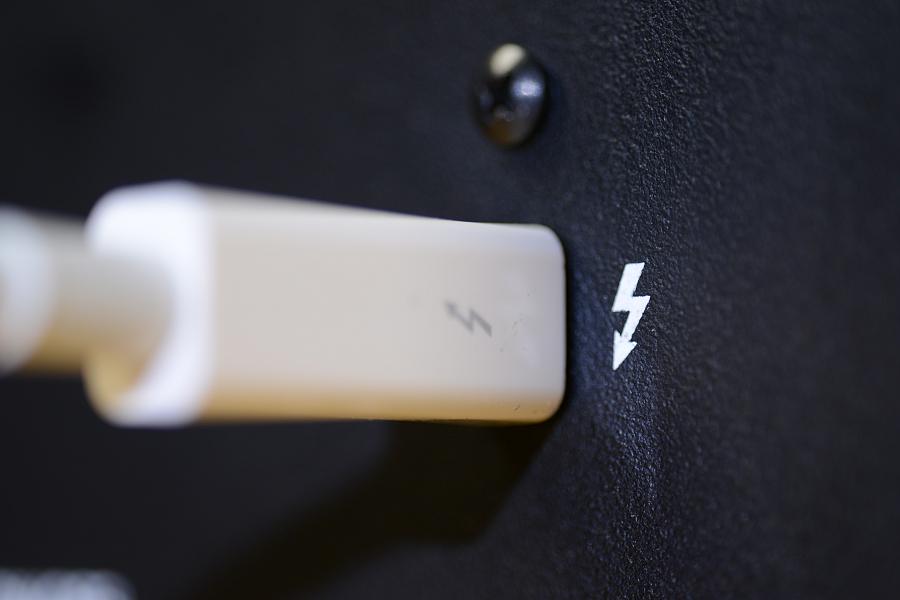
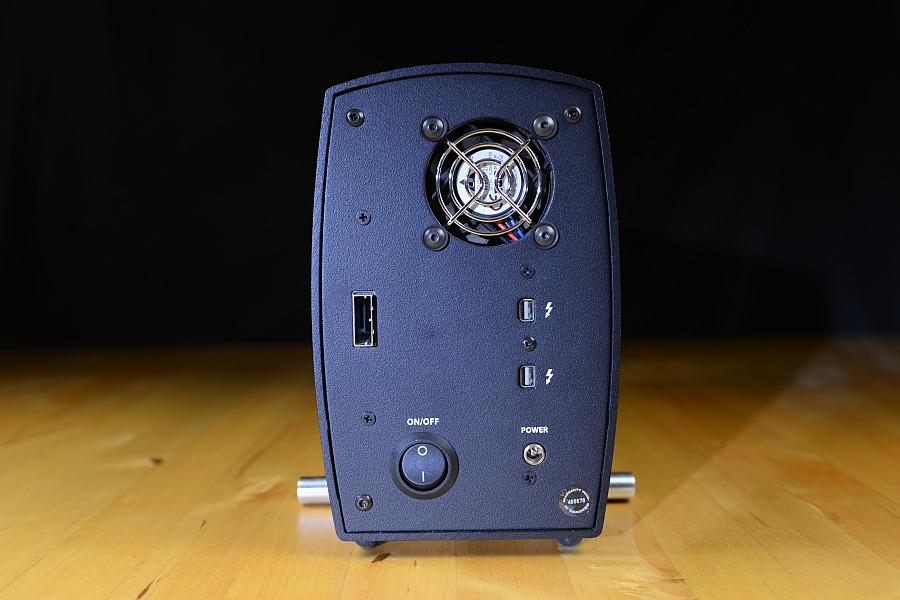
mTape by mLogic is a well-built, LTO tape unit in a substantial metal case. On the back are 2 Thunderbolt ports. Plugging in your Mac is as simple as connecting the supplied Thunderbolt cable from the back of the mTape device to your Mac.
mTape by mLogic is a well-built, LTO tape unit in a substantial metal case. On the back are 2 Thunderbolt ports. Plugging in your Mac is as simple as connecting the supplied Thunderbolt cable from the back of the mTape device to your Mac.
You need tapes to feed into the unit – mLogic recommends Fuji Ultrium. In the UK I was able to purchase these at the cost of just over 26 pounds Sterling ex-vat per 2.5GB tape. That’s a lot cheaper than hard drive space of equivalent size.
You need to download the mTape Utility (free!) This lets you communicate with the mTape unit, over Thunderbolt, direct from your Mac.
Download at: http://tinyurl.com/p7yf8yt
Download at: http://tinyurl.com/p7yf8yt
I also suggest you purchase third party software to manage to archiving process, such as PreRoll Post from Imagine Products, Inc.. This costs $499 and is available at the link below:
http://tinyurl.com/oo9cybv
http://tinyurl.com/oo9cybv
PreRoll Post will give you sophisticated selective copying and also the ability to verify files (meaning once copied the software will then compare all the files which has been copied with the original, to make sure all of the information has been written correctly.) For archive this is important!
Setting up and formatting your tape
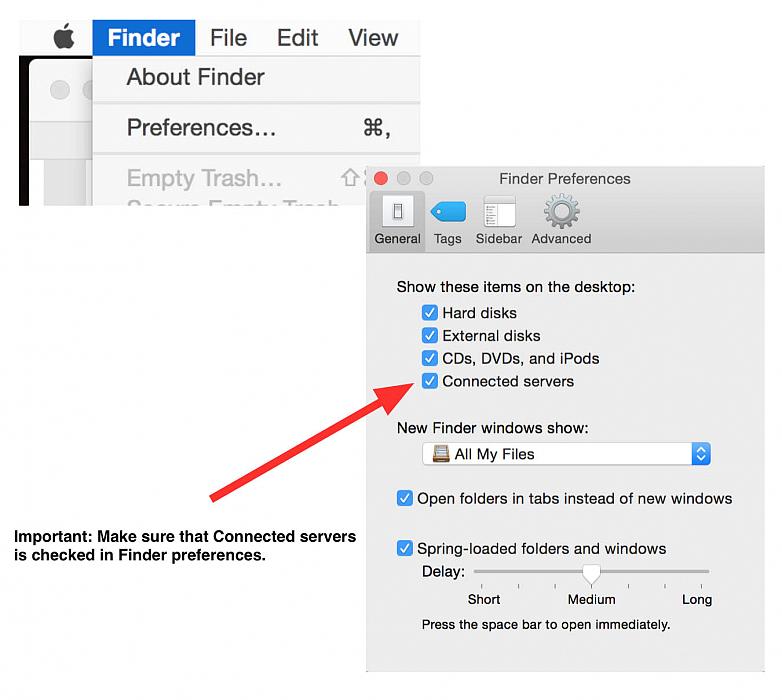
(1) The very first thing to do is select the Finder on the Mac (click this on the Dock) – then choose Finder Preferences. In General make sure Connected Servers is checked.
Setting up and formatting your tape
(1) The very first thing to do is select the Finder on the Mac (click this on the Dock) – then choose Finder Preferences. In General make sure Connected Servers is checked.
Beyond this:
Make sure you have installed the mTape Utility and restarted your computer.
(2) Connect the mTape LTO6 tape unit to Mac with the supplied Thunderbolt cable
(3) Power up the mTape unit
(4) Open the mTape Utility on your Mac
(5) Wait for the yellow flashing light on the mTape drive to turn green
(6) Insert a tape into the mTape unit (note the arrow which indicates the direction). The tape only goes in one way.

With the mTape Utility open, take time to look at the interface. You need to concern yourself with 3 areas here:
(i) Mount Tape (ii) Format Tape (iii) Unmount Tape (iv) Eject
(i) Mount Tape (ii) Format Tape (iii) Unmount Tape (iv) Eject
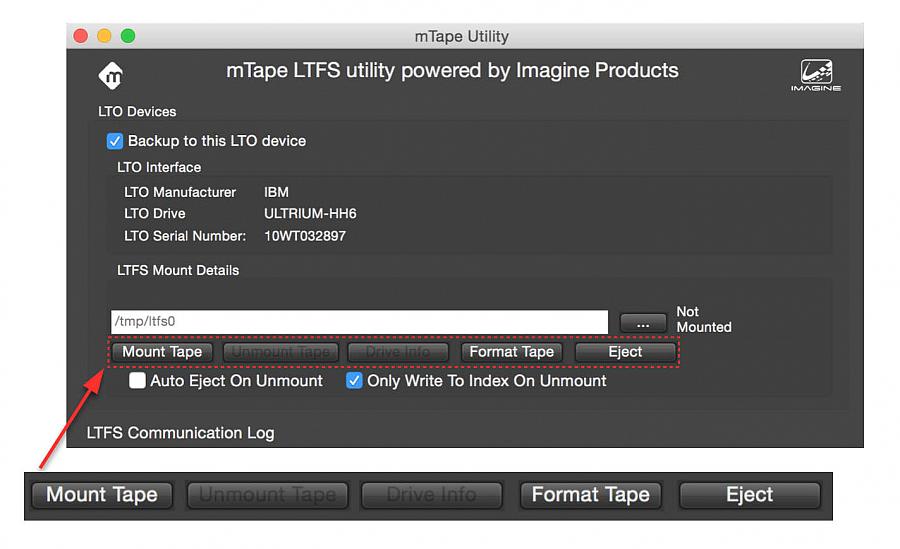
The above commands are self-explanatory, however, be aware that you cannot do anything until you format the tape.
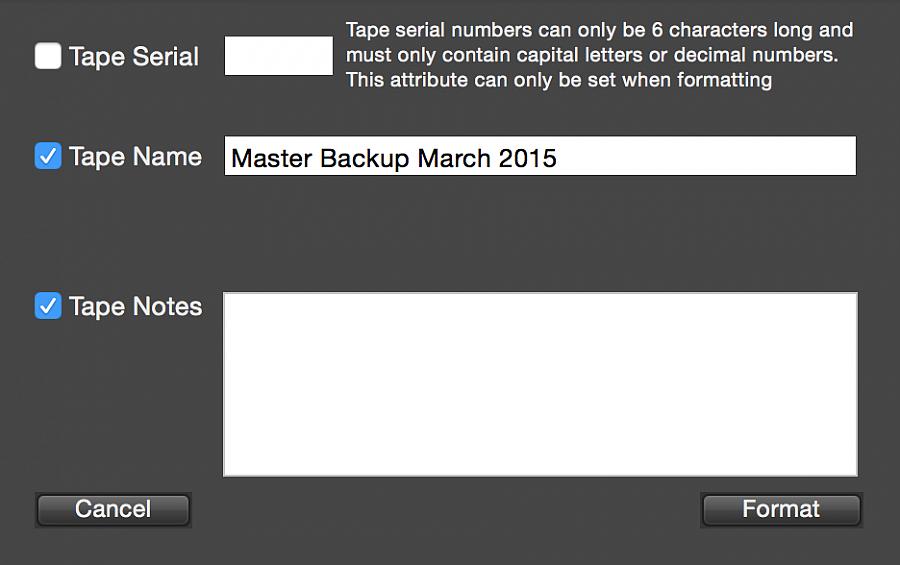
Press the Format Tape command, give the tape a name, and you will then hear the whirring of the tape drive as it spins to life. There will be a fair amount of shuttling, and some stop starting. This is normal.
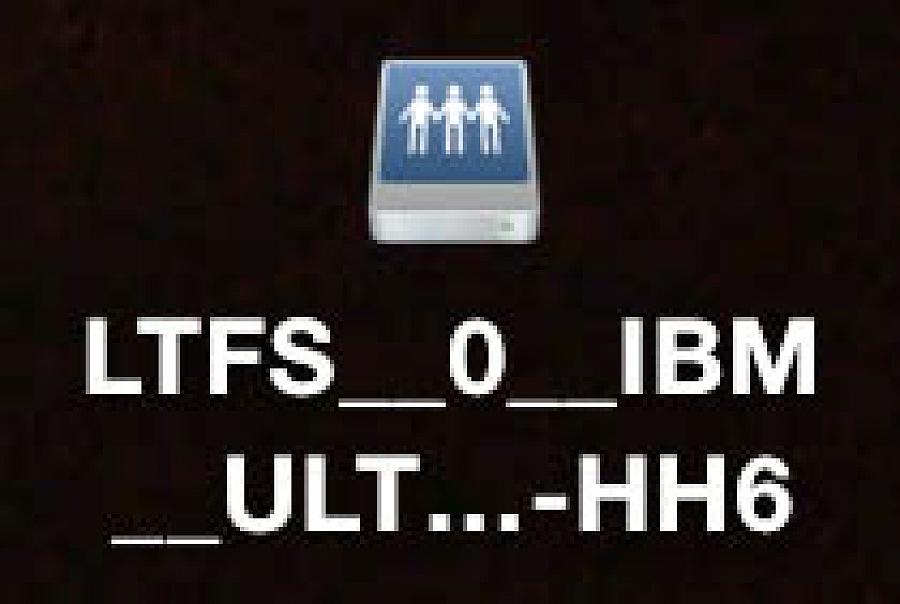
Once the formatting process is complete the tape will mount and the LTO6 icon will then appear your Mac desktop.
Once the formatting process is complete the tape will mount and the LTO6 icon will then appear your Mac desktop.
Copying Files to LTO6 Tape
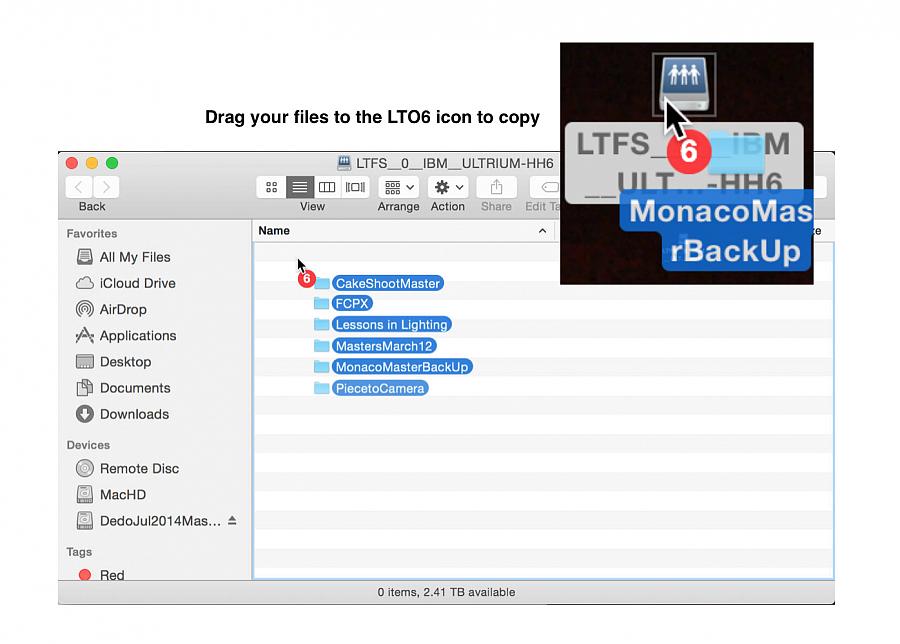
To copy files to the LTO6 tape is a matter of drag and drop.
To copy files to the LTO6 tape is a matter of drag and drop.
When copying files to LTO6, with the free mTape Utility, you may run into problems with illegal characters. Characters such as * < > “ | cannot be included in file names. If these characters are used in file names this will cause the write-process to fail. You will get an error code -50, which means the files have failed to be written.

For this reason mLogic highly suggest third party software is used to manage the process, as this will take care of renaming illegal characters for you.

Note: sometimes it takes time for the mTape unit to respond to commands or when you drop files to be copied. This is normal. You need to be patient with a tape device, as it doesn’t operate like a hard drive.
mTape by mLogic is compatible with the following list of third party software:
Axle Video – Axle
Archiware – (P5)
Imagine Products – (PreRoll Post)
Retrospect, Inc. (Retrospect)
Square Box – CatDV
StorageDNA – (DNA Evolution)
TOLIS – BRU
XenData – (XenData 6 Workstation)
YoYotta – (YoYottaID LTFS)
PreRoll Post by Imagine Products, Inc.
PreRoll Post lets you selectively choose files and folders to copy to LTO6 tape. You also have a choice of checking the data which is written to make sure there are no errors. There are 5 levels of verification, available in Settings in PreRoll Post.
PreRoll Post lets you selectively choose files and folders to copy to LTO6 tape. You also have a choice of checking the data which is written to make sure there are no errors. There are 5 levels of verification, available in Settings in PreRoll Post.

MD5 Checksum – this is the most secure method of checking and verifying the data. This is also the most time consuming method as it will write the data, and then check the written files against the original to make sure there are no errors.
You can also choose one of the other methods of file verification, all the way down to checking only the File Size or select None for no verification.
You can also choose one of the other methods of file verification, all the way down to checking only the File Size or select None for no verification.
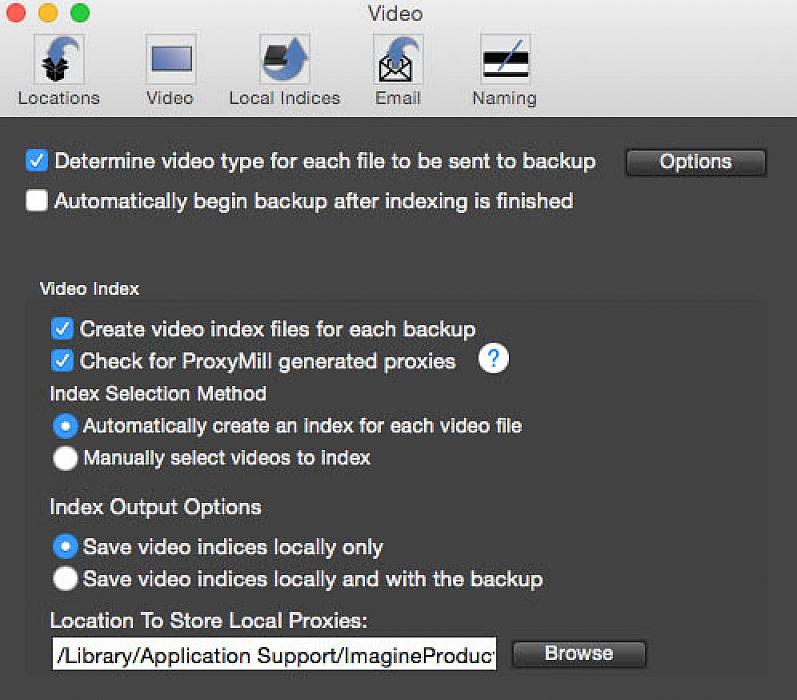
Furthermore, you can generate proxies of video files so you quickly scan these to know what is on the tape and also have PreRoll Post Create video index files for each backup.
These options are found in the settings under the button titled Video.
These options are found in the settings under the button titled Video.
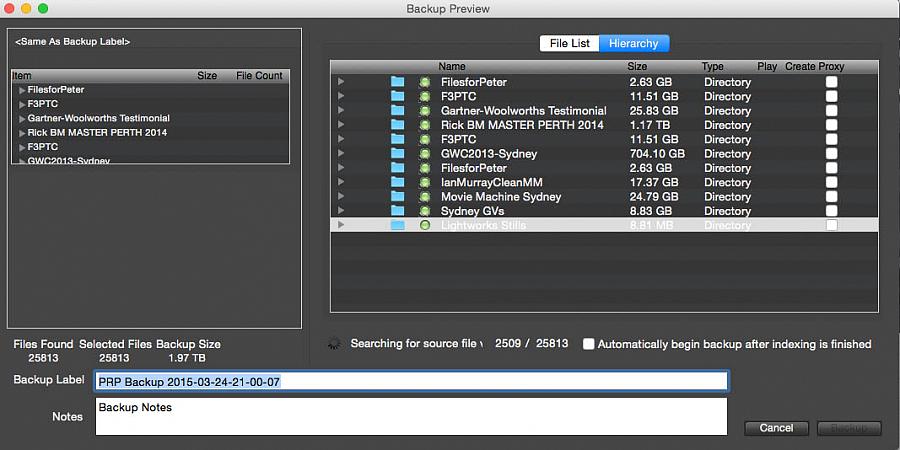
Once the settings are complete you can then add files to the PreRoll Post queue ready to be processed.

There are 2 ways to add files to the queue: (i) drag and drop the files into the main PreRoll Post window (ii) bottom left of the PreRoll Post window press the icon with the + key and then navigate to the files you wish to add.
The files will then be indexed. Press the button Prepare Backup. If you check the option Automatically begin backup after indexing is finished – as soon as the software and computer have done their work, writing to tape will then begin.
If you haven’t selected this option, once the indexing is complete, simply press Backup.

PreRoll Post streamlines the archiving process and most importantly verifies the files. In my opinion there is no point to archiving without verification! Without knowing the files have been written correctly and checked, means, if something goes wrong, the archive is useless. I have seen at least one instance of a file failing verification. As an experiment I tried to copy the file to drive and the process failed. That’s why I use PreRoll Post – to copy files to LTO tape and to then verify that these files are written correctly.
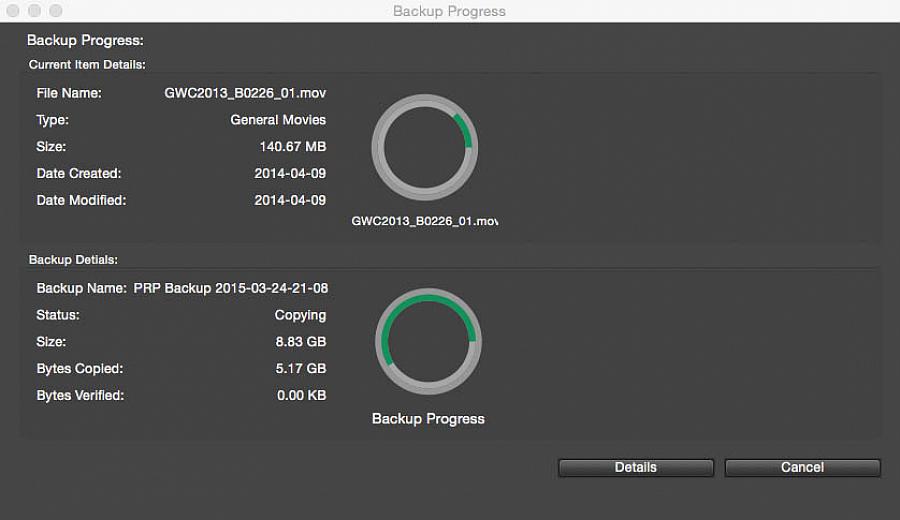
In the above image the green line in the circle shows how much data has been copied to LTO6 tape. You can therefore keep track of the progress as your files are written.
Writing Final Cut Pro X Libraries to LTO tape
When writing Final Cut Pro X Libraries to LTO6, using PreRoll Post, you will be presented with a page of information.
When writing Final Cut Pro X Libraries to LTO6, using PreRoll Post, you will be presented with a page of information.
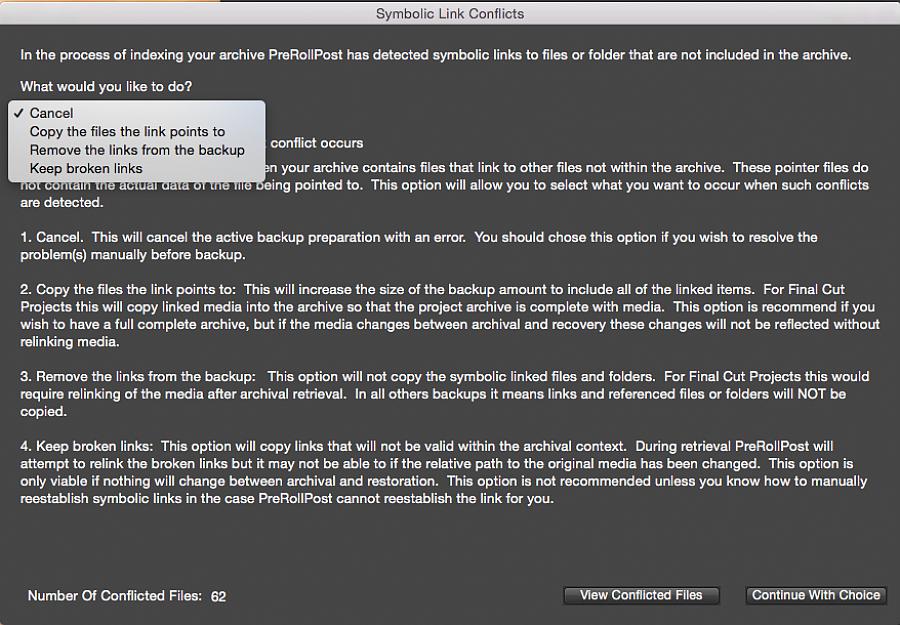
You have several options to chose from – these are also available in Settings of PreRoll Post.

You can choose to Cancel the writing of the files to tape.
If you select Copy the files the link points to this will copy all associated files and therefore increase the size of the Library you are are writing to tape.
The third choice Remove the links from the backup will enable you to write the file; personally I don’t like the idea of removing links which already exist in my Final Cut Pro X Library.
Finally Keep broken links – this would be my choice, as essentially the Final Cut Pro X Library will be written as it already exists.
The alternative is to Zip up your Final Cut Pro X Library and then write the Zipped file to tape. This would seem to me to be the most secure method, as absolutely nothing is being changed. However, Zipping up a large Library, with media contained internal to the Library, can take some time. For absolute safety I would recommend this method.

Above: This is the layout I most often use with the PreRoll Post settings open on the left; the main PreRoll Post window bottom right; and mTape Utility open top right of screen.
I’m a believer that you need to cover your bases in as many ways as possible. I recommend, to ensure the safety of your precious work and your clients precious work, that you have content backed up on hard drive and archived onto tape. You need both! There’s a saying that unless your data exists in at least 3 places then it doesn’t exist at all. All is takes is for a few molecules to be knocked out of alignment to ruin what exists on any format. I also suggest storing your drives in one location and your tapes in another. Just in a case one place burns down or some other disaster strikes. You never know what will happen!
To really get the most out of the mTape system in terms of speed you want to go Thunderbolt throughout the entire transfer chain. That means the data you are copying is on a Thunderbolt drive, plugged into the mTape unit over Thunderbolt, or another Thunderbolt port on your Mac. This ensures maximum transfer speed – and the transfer can be quite quick. I’ve written 100GB to tape in less than 25 minutes – with verification, under 45 minutes. You only get these speeds with everything plugged in over Thunderbolt.
Of course, you can transfer from USB3, FireWire, eSATA, whatever protocol you wish to use – so long as you can plug these devices into your Mac – however, don’t expect the same speeds that will be achieved when transferring over Thunderbolt.
Writing from LTO6 tape back to hard drive
When it comes to writing files from LTO6 tape back to hard drive – this is a matter of drag and drop. Highlight the files on tape and drag these direct to hard drive and the data transfer will then take place.

While LTO6 is a sizeable investment the obvious question to ask is what price will you pay if you lose client work. I know of true situations where unimaginable nightmares have gone on in the post production world with entire projects and broadcast programmes going missing. Wherever there is technology it can go always go wrong, and wherever humans are involved, it can also go wrong. The idea is to protect yourself from risk.
If you can’t afford LTO6 then at least back up your information on 2 drives. The problem is lighting does sometimes strike twice and 2 drives can go out of action – or more likely, one was misplaced or erased because someone needed the space… all too easy to screw up with drives.
Would I trust LTO6 The answer is yes. This is about minimising risk. Once I have done an LTO archive, I then unmount the tape, eject it, and then reload it just to make sure the file structure is in place and being read by the Mac connected to the mTape unit. Providing the tape mounts, and I can see the contents, I then feel safe that the information is safely protected. I also keep the most important files and projects on hard drive. I protect myself as well as I can, on all fronts.
The process of LTO6 archive is pretty much flawless once you know what you’re doing. Don’t expect the LTO6 device to function like a hard drive – its different. Think linear. Collate the content you wish to archive and go back to it whenever you need to access the files. The hope is you never will! Fortunately I have eliminated the need to store material on 2 or 3 drives. I now keep a copy on hard drive and another on LTO6. Or, if I’m feeling particularly vulnerable about a particular job, I will keep everything backed up on 2 hard drives and and also archived to LTO6.
And I make sure these masters are stored in different places.
Above: interview with Roger Mabon, mCEO of mLogic. Roger explains the relevance of LTO6 as an archiving medium for video editors and production facilities.